1. Overview The S19 Pro server is Bitmain’s newest version in the 19 server series. Power supply APW12 is part of S19 Pro server. All S19 Pro servers are tested and configured prior to shipping to ensure easy set up.
Caution:
1)The equipment must be connected to an earthed mains socket-outlet. The socket-outlet shall be installed near the equipment and shall be easily accessible.
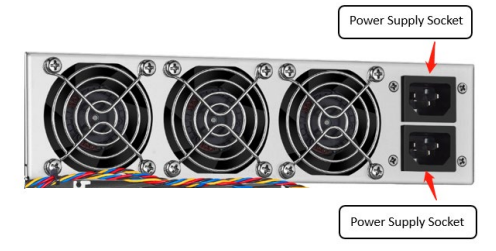
2)The equipment has two power inputs, only by connecting those two power supply sockets simultaneously can the equipment run. When the equipment is powered off, be sure to power off all power inputs.
3)Please refer to the layout above to place your goods in usage in case of any damage.
4)DO NOT remove any screws and cables tied on the product. 5. DO NOT PRESS the metal button on the cover.
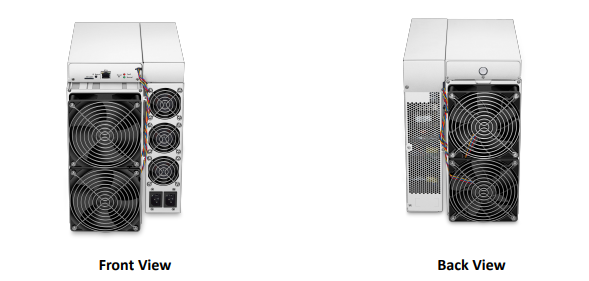
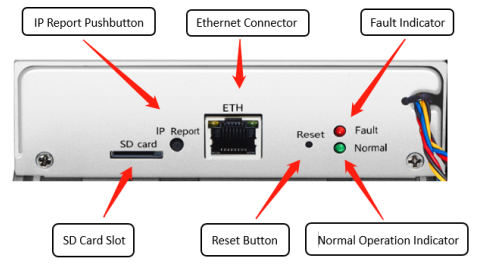
1.1 S19 Pro Server Components The main components and controller front panel of S19 Pro servers are shown in the following figure:
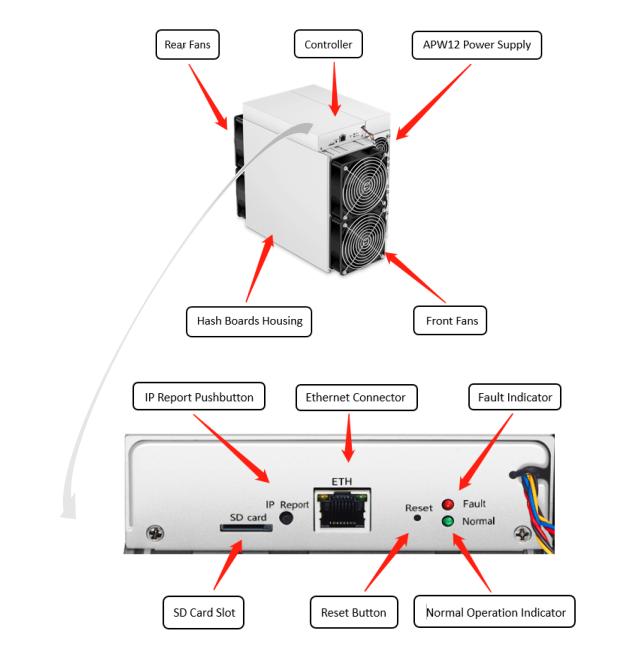
APW12 Power Supply:
Note:
1.Power supply APW12 is part of S19 Pro server. For detailed parameters, please refer to the specifications below.
2.Additional two power cords are needed.
1.2 Specifications
| Product Glance | Value |
| Version
Model No. Crypto Algorithm/Coins |
S19 Pro
240-C SHA256/BTC/BCH |
| Hashrate, TH/s | 110.00 |
| Reference power on wall, Watt | 3250±5% |
| Reference power efficiency on wall @25°C, J/TH | 29.5±5% |
| Hardware Configuration | |
| Networking connection mode | RJ45 Ethernet 10/100M |
| Server Size (Length*Width*Height, w/o package),mm | 370*195.5*290 |
| Server Size (Length*Width*Height, with package),mm | 570*316*430 |
| Net weight, kg | 13.20 |
| Gross weight, kg | 15.30 |
NOTE:
1.The pictures shown are for reference only, the final shipment version shall prevail.
2.To prevent the spread of virus in the firmware, which can cause damage to the Antminer S19 series, the setting function of “Secure Boot” has been switched on and the “Root Authority” function has been disabled.
3.If the user fails to use the product in accordance with the given instructions, specifications, and conditions provided, or change the function setting without Bitmain's prior consent, Bitmain will not be liable for any damage arising therefrom.
2. Setting Up the Server
To set up the server:
*The file IPReporter.zip is supported by Microsoft Windows only.
1.Go to the following site: DOCBitmain
2.wnload the following file: IPReporter.zip.
3.Extract the file.
*The default DHCP network protocol distributes IP addresses automatically.
4.Right-click IPReporter.exe and run it as Administrator.
5.Select one of the following options:
■ Shelf, Step, Position – suitable for farm servers to mark the location of the servers.
■ Default – suitable for home servers.
6.Click Start
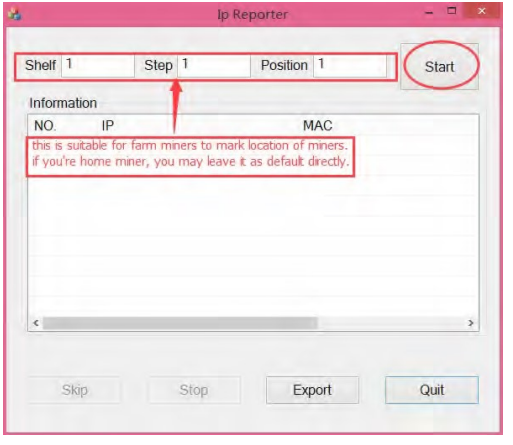
7.On the control panel, click the IP Report button. Hold it down until it beeps (about 5 seconds).
The IP address will be displayed in a window on your computer screen
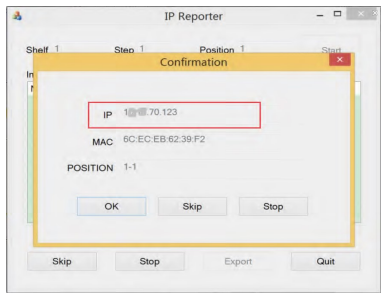
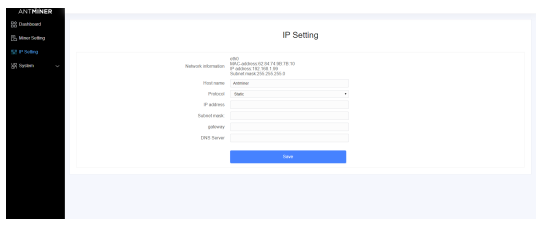
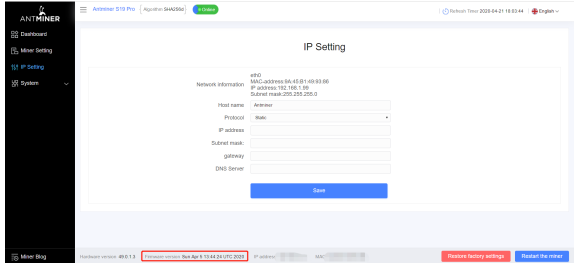
8.In your web browser, enter the IP address provided.
9.Proceed to login using root for both the username and password.
10.In the Protocol section, you can assign a Static IP address (optional).
11.Enter the IP address, Subnet mask, gateway and DNS Server.
12.Click “Save”.
13.Click https://support.bitmain.com/hc/en-us/articles/360018950053 to learn more about gateway and DNS Server.
3. Configuring the Server
Setting Up the Pool
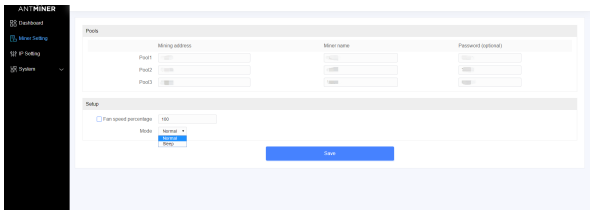
To configure the server:
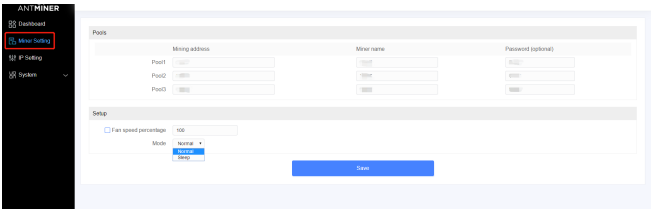
1.click Setting marked below.
Note:
i.Fan speed percentage can be adjusted, but we recommend to keep the default setting. The server will adjust the fan speed automatically if the fan speed percentage has yet been selected.
ii.There are two working modes of S19 Pro server: Normal mode and Sleep mode. The server enters the sleep mode under the condition that the control board is powered while hashboards are not powered.
2.Set the options according to the following table:
| Option | Description |
| Mining address | Enter the address of your desired pool.*The S19 servers can be set up with three mining pools, with decreasing priority from the first pool (pool 1) to the third pool (pool 3).
*The pools with low priority will only be used if all higher priority pools are offline. |
| Name | Your worker ID on the selected pool. |
| Password (optional) | The password for your selected worker. |
3.Click "Save" after the configuration.
4. Monitoring Your server
To check the operating status of your server:
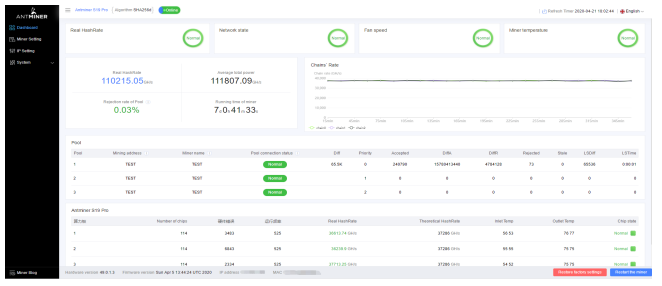
1.Click dashboard to check the server status.
*Note: The S19 Pro server is with fixed frequency 675 MHz. Firmware will stop running when the Temp (Outlet) reaches to 95℃,there will be an error message “over max temp, pcb temp (real-time temp)” shown on the bottom of kernel log page. Meanwhile, the server temperature on the dashboard interface turns to abnormal and shows “Temp is too high”.
2.Monitor your server according to the descriptions in the following table:
| Option | Description |
| Number of chips | Number of chips detected in the chain. |
| Frequency | ASIC frequency setting. |
| Real Hashrate | Real-time Hashrate of each hash board (GH/s). |
| Inlet Temp | Temperature of the inlet (°C). |
| Outlet Temp . | Temperature of the outlet (°C) |
| Chip state | One of the following statuses will appear:● The Green Icon - indicates normal ● The Red Icon- indicates abnormal |
5. Administering Your Server
5.1 Checking Your Firmware Version
To check your firmware version:
1.Enter the backstage of your server, find the firmware version on the bottom.
2.Firmware Version displays the date of the firmware your server uses. In the examples below, the server is using firmware version 20200405.
5.2 Upgrading Your System
*Make sure that the S19 Pro server remains powered during the upgrade process. If power fails before the upgrade is completed, you will need to return it to Bitmain for repair.
To upgrade the server’s firmware:
1.In System, click Firmware upgrade.
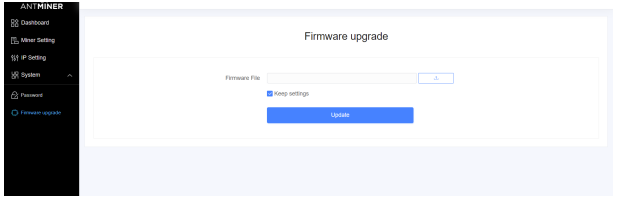
2.For Keep Settings:
■ Select “keep settings” to keep your current settings (default).
■ Unselect “keep settings” to reset the server to default settings.
3.Click the button and navigate to the upgrade file. Select the upgrade file, then click Update.
4.When the upgrade is completed, restart the server and it will turn to the setting page.
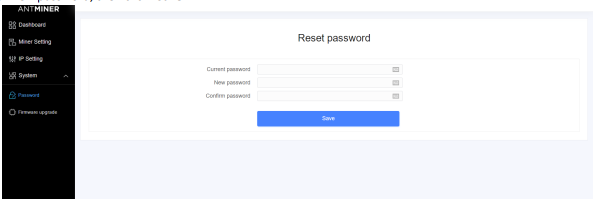
5.3 Modifying Your Password
To change your login password:
1.In System, click the Password tab.
2.Set your new password, then click "Save".
5.4 Restoring Initial Settings
To restore your initial settings
1.Turn on the server and let it run for 5 minutes.
2.On the controller front panel, press and hold the Reset button for 10 seconds.
*Resetting your server will reboot it and restore its default settings. The red LED will automatically flash once every 15 seconds if the reset is operated successfully. - 15 - S19 Pro Server Installation Guide
Environmental Requirements
Please run your server in accordance with the following requirements
1.Basic Environmental Requirements:
1.1. Climatic Conditions:
| Description | Requirement |
| Operating Temperature | 0-40℃ |
| Operating Humidity | 10-90%RH (non-condensing) |
| Storage Temperature | -20-70℃ |
| Storage Humidity | 5-95%RH(non-condensing) |
| Altitude | <2000m |
1.2. Site Requirements of the Server Running Room:
Please keep the server running room away from industrial pollution sources: For heavy pollution sources such as smelters and coal mines, the distance should be more than 5km. For moderate pollution sources such as chemical industries, rubber and electroplating industries, the distance should be more than 3.7km.
For light pollution sources such as food factories and leather processing factories, the distance should be more than 2km. If unavoidable, the site should be chosen in the perennial upwind direction of the pollution source. Please do not set your location within 3.7km from the seaside or the salt lake. If unavoidable, it should be built as airtight as possible, equipped with air conditioning for cooling.
1.3. Electromagnetic Environmental Conditions: Please keep your site away from transformers, high-voltage cables, transmission lines and high-current equipment, for example, there should be no high-power AC transformers (>10KA) within 20 meters, and no high-voltage power lines within 50 meters. Please keep your site away from high-power radio transmitters, for example, there should be no high-power radio transmitters (>1500W) within 100 meters.
2.Other Environmental Requirements:
The server running room shall be free of explosive, conductive,magnetically conductive and corrosive dust. The requirements of mechanical active substances are shown below:
2.1 Requirements of Mechanical Active Substances
| Mechanical Active Substance | Requirement |
| Sand | <= 30mg/m3 |
| Dust (suspended) | <= 0.2mg/m3 |
| Dust (deposited) | <=1.5mg/m2h |
2.2 Requirements of Corrosive Gas
| Corrosive Gas | Unit | Concentration |
| H2S | ppb | < 3 |
| SO2 | ppb | < 10 |
| Cl2 | ppb | < 1 |
| NO2 | ppb | < 50 |
| HF | ppb | < 1 |
| NH3 | ppb | < 500 |
| O3 | ppb | < 2 |
| Note: ppb (part per billion) refers to the unit of concentration,1ppb stands for the volume ratio of part per billion | ||
Regulations:
FCC Notice (FOR FCC CERTIFIED MODELS):
This device complies with part 15 of the FCC Rules. Operation is subject to the following two conditions: (1) This device may not cause harmful interference, and (2) this device must accept any interference received, including interference that may cause undesired operation.
Note: This equipment has been tested and found to comply with the limits for a Class A digital device, pursuant to part 15 of the FCC Rules. These limits are designed to provide reasonable protection against harmful interference when the equipment is operated in a commercial environment. This equipment generates, uses, and can radiate radio frequency energy and, if not installed and used in accordance with the instruction manual, may cause harmful interference to radio communications. Operation of this equipment in a residential area is likely to cause harmful interference in which case the user will be required to correct the interference at his own expense.
EU WEEE: Disposal of Waste Equipment by Users in Private Household in the European Union
This symbol on the product or on its packaging indicates that this product must not be disposed of with your other household waste. Instead, it is your responsibility to dispose of your waste equipment by handling it over to a designated collection point for the recycling of waste electrical and electronic equipment. The separate collection and recycling of your waste equipment at the time of disposal will help to conserve natural resources and ensure that it is recycled in a manner that protects human health and the environment. For more information about where you can drop off your waste equipment for recycling, please contact your local city office, your household waste disposal service or the shop where your purchased the product.
Post time: Jan-25-2022